Friday, December 31, 2010

Free Knitting Pattern 90619C Brisbane Scarf : Lion Brand Yarn Company

This is a classic scarf pattern, So gorgeous. The deep ridges makes it look very difficult, but I promise it is not. Perfect for a beginning knitter. Just two stitches, knit and purl. If you are new to knitting this is for you. If you just appreciate a gorgeous scarf, this is for everyone.

Thursday, December 23, 2010

Adorable Crocheted Baby Dress

Just when you thought crochet couldn't get any cuter along comes this adorable crocheted baby dress. Using this free crochet pattern and sport weight yarn you can make this for your little girl in no time.

Instructions are for 3-6 months; changes for 6-9 months and 9-12 months are in [ ].
 

Materials :

  • Sports weight yarn - 9 [11,13] ozs white.
  • 4 x 3/8" buttons.
  • E crochet hook.

Gauge : 5 sc = 1"; 6 sc in back lp rows = 1"; 4 shell rows = 2 + 1/4".

Instructions:
Reverse sc crochet = working from left to right, insert hook in next st to the right, complete as sc.
DRESS BODICE : Row1: Ch 56, sc in 2nd ch from hook, sc in next 5 ch, 3 sc in next ch, ( forms corner ) * sc in next 13 ch, 3 sc in next ch ( forms corner ); rep from * 2 more times, sc in last 6 ch, turn (63 sts).
Note. Work the fol. rows in Back Loops only unless otherwise stated.
Rows 2-11: [ 2-12, 2-13 ] : Ch 1, sc in each st across with 3 sc in each centre corner st, turn, ending with 143 [151, 159 ]. sc in last row.
Rows 12 [ 13,14 ] : Ch 1, sc in first 18 [19, 20 ] sts; for first Armhole, ch 9, skip next 35 [37,39 ] sts; sc in next 37 [39,41 ] sts; for 2nd Armhole, ch 9, skip next 35 [37,39 ] sts; sc in last 18 [19,20 ] sts, turn (73 sc, 2 ch - 9 sps) [ 77 sc, 2 ch - 9 sps; 81 sc, 2 ch - 9 sps ).
Row 13: [14,15] : Ch 1, sc in each st and each ch across, turn (91 sc) [ 95 sc, 99 sc].
Rows 14-19 : [15 - 21, 16-25] : Ch 1, sc in each st across. At end of last row, fasten off.

BUTTONHOLE ROW : Row 1 : Working in ends of rows across Left Back, with right side of work facing you, join with sc in first row, sc in each row across, turn (19 sc) [ 21 sc, 25 sc,].
Row 2: Ch 1, sc in each st across, turn.
Row 3: Ch 1, sc in first 4 [4,6] sts; for Buttonhole, ch 2, skip next 2 sts, * sc in next 4 [5,6] sts; for Buttonhole, ch 2, skip next 2 sts; rep from * one more time, sc in last st, turn.
Row 4 : Ch 1, sc in each st and 2 sc in each ch 2 sp across, turn (19 sc) [ 21sc, 25 sc].
Row 4 : ch 1, sc in each st across, fasten off.

BUTTON ROW : Row 1: Working in ends of rows across Right Back, with right side of work facing you, join with sc in first row, sc in each row across, turn (19) [21 sc, 25 sc].
Rows 2-5 : Ch 1, sc in each st across, turn. At end of last row, fasten off.
For Necktrim, working in ends of rows across Buttonhole and Button Rows and in starting ch on opposite side of row 1 on Bodice, with right side of work facing you, join with sc in last row on Button row, working from left to right, reverce sc in each row and in each ch across, fasten off.

SKIRT : (worked in Both Loops) Round 1 : Working in ends of rows of Button and Buttonhole and on last row of Bodice, hold Buttonhole over Button; matching rows and working through both thicknesses, join with sc in first row, sc in next 4 rows; working on Bodice only, sc in each st around, join with sl st in first sc (96 sc) [100sc, 104 sc].
Notes = for beginning V-stitch (beg V-st), ch 5, dc in same st.
for V-stitch (V-st), dc, ch 2, dc) in next st.
Round 2 : Beg. V-st, skip next st, (V-st in next st, skip next st, ) around, join with sl st in 3rd ch of ch 5 (48 V-sts) [50 V-st, 52 V-sts].
Round 3 : Sl st in next ch sp, ch 3, (dc, ch 2, 2 dc) in same space, (2 dc, ch 2, 2 dc) in ch space of each V-st around, join with sl st in top of ch 3.
Rounds 4-5 : [4-6, 4-7] : Sl st in next st, sl st in next ch sp, ch 3, ( dc, ch 2, 2 dc) in same space, (2 dc, ch 2, 2 dc ) in each ch sp around, join.
Round 6 : [7,8] : Sl st in next st, sl st in next ch sp, ch 3, ( 2 dc, ch 2, 3 dc ) in same sp, ( 3 dc, ch 2, 3 dc) in each ch sp around, join.
Rounds 7 - 12 [8-14, 9-16] : Sl st in each of next 2 sts, sl st in next ch sp, ch 3, ( 2 dc, ch 2, 3 dc ) in same sp, ( 3 dc, ch 2, 3 dc ) in each ch sp around, join.
Rounds 13 : [15,17] : Sl st in each of next 2 sts, sl st in next ch sp, ch 3, 7 dc in same sp; for Scallop, 8 dc in each ch sp around, join.
Round 14 : [16,18] : Sl st in next 4 sts, 9 dc in sp between last Scallop and next Scallop, (sl st in 5th dc of next Scallop, 9 dc in sp between last Scallop and next Scallop) around, join with sl st in first sl st, fasten off.
Sew buttons to Button row opposite Buttonholes. Sew pretty buttons and sew a flower to the dress.
 

If this is not the cutest crochet baby girl dress, I don't know what is. It is adorable. And it looks really easy, but complicated enough to make the recipient mother go wow! Love this one. And it is nice enough for the crochet beginner

Tuesday, December 21, 2010

Free Knitting Pattern 81057B Cable Panel Scarf : Lion Brand Yarn Company

What a great looking scarf! Isn't that cable gorgeous. And the edging. This is one great pattern. I can't wait to start it. And it is marked as Easy so perfect for a beginning knitter

Saturday, December 18, 2010

Fingerless Cable Gloves Knitting Pattern from Caron Yarn

This easy knitting pattern creates a pair of fingerless gloves with a lovely cable running down the length. These fingerless gloves or fingerless mittens make for a quick and easy knitting project.


Knit Fingerless Cable Gloves


Materials:

  • Caron International's Simply Soft (100% acrylic; 6 oz/170 g, 315 yds/288 m skein):
  • Shown in #9722 Plum Wine
  • One pair each size US 6 and 7 (4 and 4.5 mm)
  • Yarn needle
  • Cable needle (cn)
  • Stitch markers
  • Stitch holders


Size: Woman's Medium/Large, Glove measures approximately 4" wide by 14" long


Gauge: In Stockinette st, 18 sts and 22 rows = 4"/10 cm, using larger needles 
 

Abbreviations:

C4B: Slip 2 sts to cn, hold to back, k2, k2 from cn.

C4F: Slip 2 sts to cn, hold to front, k2, k2 from cn.

k1-f/b: Knit next st through the front loop, then through the back loop to increase 1 st.


Stitches:

Stockinette stitch (St st): Knit on RS, purl on WS

1X1 rib (multiple of 2 sts)

Row 1 (RS): * K1, p1; rep from * across.

Row 2: Knit the knit sts and purl the purl sts as they face you.

Repeat Row 2 for 1X1 rib.

Cable/Moss Stitch (Panel of 22 sts)

Row 1 (RS): [K1, p1] 4 times, pm; k6; pm, [p1, k1] 4 times.

Row 2 and all WS rows: Knit the knit sts and purl the purl sts as they face you.

Row 3: [P1, k1] 3 times, p2; C4F, k2; p2, [k1, p1] 3 times.

Row 5: [K1, p1] 4 times; k2, C4B; [p1, k1] 4 times.

Row 6: Repeat Row 2.

Repeat Rows 3 – 6 for Cable/Moss st.


Tips:

  • To cast on loosely: Cast on with larger needles, then change to smaller needles for working rib.
  • Place a marker (pm), each side of 6-st Cable, and between Cable/Moss panel and St st.


Instructions:
 

RIGHT GLOVE

Beginning at upper edge, using smaller needles, loosely CO 44 sts. (RS) Begin 1 x 1 rib; work even for 10 rows, end WS row.

Change to larger needles.

Establish Pattern: (RS) Work Row 1 of Cable/Moss st across 22 sts, pm; change to St st, work to end. Continue as established, work Rows 2 – 6 of Cable/Moss st once, then repeat Rows 3 – 6, and keep remaining sts in St st; work even until piece measures 10" from beginning, end with a RS row.

Shape Palm: (WS) Dec 4 sts evenly across St st panel; work to end—40 sts remain; 22 in Cable/Moss, 18 in St st.

Change to smaller needles.

Establish Thumb Gusset: (RS) Work across to marker; [k1-f/b] twice; pm, work to end in St st—42 sts; 4 sts in St st for Thumb Gusset between markers.

(WS) * Work 1 row even.

(RS) Work across to marker; k1-f/b in st after marker, knit across to last 2 sts before second marker, k1-f/b, k1; work to end—6 sts between Thumb Gusset markers.

Repeat from * 4 times, end with a RS row—14 sts between markers.

Thumb: (WS) Work across to marker, place sts of St st panel on holder; work 14 sts of Thumb Gusset, turn; leave remaining 22 sts unworked (place on holder, if desired).

(RS) Working on 14 sts of Thumb only, work even for 4 rows in St st. Change to 1 x 1 rib; work even for 4 rows. Bind off all Thumb sts loosely in rib. Fasten off yarn.

Hand: With WS facing, using smaller needles, place St st panel from holder on needle; cast on 2 sts (under Thumb Gusset); work across 22 sts of Cable/Moss panel.

(RS) Continue in Pattern as established; work even for 4 rows, end with a WS row.

(RS) Change to 1 x 1 rib; work even for 4 rows.

Bind off all sts loosely in rib.  


LEFT GLOVE

Using smaller needles, loosely CO 44 sts. (RS) Begin 1 x 1 rib; work even for 10 rows, end WS row.

Change to larger needles.

Establish Pattern: (RS) Work 22 sts in St st, pm; change to Cable/Moss st, work Row 1 across remaining 22 sts. Continue as for Right Glove, reversing shaping by beginning Thumb Gusset 2 sts before the marker separating the panels.


FINISHING: Sew side seams. Weave in ends.


Knit Fingerless Cable Gloves Chart


These fingerless gloves are just wonderful. I love have my fingers free but my hands warm. And for some reason my fingers are warm too. The pattern for this is terrific and you could shorten or lengthen the arm according to your needs. And this pattern is easy enough for a beginning knitter

Tuesday, December 14, 2010

Knit Leg Warmers

Web-Letter, Issue 169 – Waterlily Leg Warmers

Photos courtesy of
Meg Myers.
Sign up to receive weekly Web-Letters from Classic Elite.

It is the weather around here in Michigan that there is a great need for leg warmers. This is a great take along project and could be made of many different yarns. The pattern is included. You can see other patterns and information at Best Darn Yarns

Friday, December 10, 2010

Classic Knit Merino Hat


This hat will be a favorite for anyone you choose to give it to. Soft 100% Merino Wool with a classic style is sometimes referred to as a beret or tam. It’s really cute and easy to knit for beginners.

Classic Merino Knitted Hat

One size fits all and can be adjusted around face edge. Fits med-X/large

Materials:

  • Yarn: merino wool worsted weight 200 yards
  • Knitting Board with 80 needles (28”
  • knitting board)
  • Knit hook
  • Crochet hook

Version I Instructions: (as shown)

  1. Cast On (80) stitches. Place anchor yarn.
  2. Knit in Rib Stitch for (30) rows.
  3. Bind Off from board.

Version II:

  1. Cast On (80) stitches
  2. Knit in Rib Stitch for (6) rows.
  3. Change to Stockinette Stitch. Knit for (4) rows.
  4. Change to Rib Stitch. Knit for (4) rows.
  5. Change to Stockinette Stitch. Knit for (4) rows.
  6. Change to Rib Stitch. Knit for (4) rows.
  7. Change to Stockinette Stitch. Knit for (8) rows.
  8. Bind Off from Board. This edge will be top of hat.

SEWING THE HAT:

  1. Fold hat so that the (2) shorter side edges are together. Sew with invisible stitch.
  2. Version II top of hat is the Stockinette end.
  3. Create the top of hat by lacing a double strand of yarn thru the hat about 2” from top of hat. Draw the double yarn tightly and knot. Draw tails to inside of hat.
  4. Finish front edge of hat (anchor yarn) by binding off the stitches creating desired tightness for head size.
  5. Hat can be worn close to face to one side, or as full head cover.


I love love love this hat. It is so soft and stretchy that it will fit over a hair do and it is nice how it doesn't have an actual band around your head. It is great and it is not so difficult that it wouldn't do well for a beginning knitter.

Friday, November 19, 2010

Creta Lace Socks

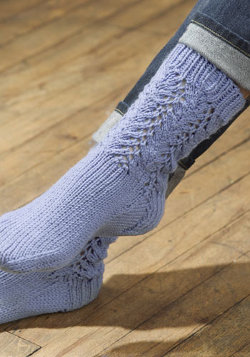
Knitting socks isn't just for grannies anymore. Become a knit master with this free pattern for Creta Lace Socks!
 

MATERIALS
 

  • Yarn: Naturally Caron.com Spa 75% Microdenier acrylic, 25% bamboo; 3 oz/85 g, 251 yds/230 m ball): 3 balls. Shown in: #0006 Berry Frappe
     
  • One set of 4 double point needles (dpn) size US 6 (4 mm), or size to obtain gauge
     
  • Split ring marker
     
  • Yarn needle


SIZES: Adult Medium (Large)


KNITTED MEASUREMENTS

Foot: 7 ½ (8 ½)”/19 (21.5) cm


GAUGE

In k1, p1 rib, 22 sts and 26 rows = 4"/10cm

In Stockinette st, 22 sts and 26 rows = 4"/10cm

In Open and Closed Fans st, 22 sts and 26 rows = 4"/10cm


STITCHES USED

Yarn over (yo)

K1, p1 rib

Stockinette stitch (St st)

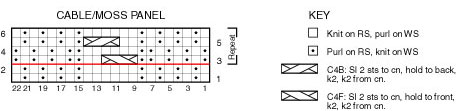
Open and Closed Fans (multiple of 9 sts + 2)

Rnd 1: K2, *yo, k2, ssk, k2tog, k2, yo, k1; repeat from * around.

Rnd 2: Knit.

Rnd 3: K1, *yo, k2, ssk, k2tog, k2, yo, k1; repeat from * around, ending with k1.

Rnd 4: Knit.

Repeat Rnds 1-4 for Open and Closed Fan st.


NOTE

To make the top of rib on socks more elastic, use a #7 straight needle and transfer the sts onto 3 of the size 6 dpns.


SOCKS

CO 46 sts. Place 15 sts on needles #1 & 3, 16 sts on needle #2. Join rnd being careful not to twist sts, placing marker at beginning of rnd.

Work in k1, p1 rib for 1 ½”.

Knit next rnd inc 1 st. -- 47 sts.

Work in Open and Closed Fan st until sock measures 7 ½ (8 ½)”, ending with a k rnd and inc 1 st in last rnd -- 48 sts.

Heel Flap (worked back and forth in rows):

(RS) Knit across 24 sts; put remaining 24 sts on an extra dpn.

Row 1 (WS): S1, purl across.

Row 2: *Sl 1, k1; repeat from * across ending with Row 1.

Repeat these 2 rows for approx. 2 ½” (6cm).

Note: There should be 11 long loops on side of heel flap.

Turn Heel:

Row 1: Sl 1, k12, ssk, k1, turn.

Row 2: Sl 1, p3, p2tog, p1, turn.

Row 3: Sl 1, k4, ssk, k1, turn.

Row 4: Sl 1, p5, p2tog, p1, turn.

Row 5: Sl 1, k6, ssk, k1, turn.

Row 6: Sl 1, p7, p2tog, p1, turn.

Row 7: Sl 1, k8, ssk, k1, turn.

Row 8: Sl 1, p9, p2tog, turn

Row 9: Sl 1, k10, ssk, k1, turn.

Row 10: Sl 1, p11, p2tog, p1, turn.

There should be 14 sts rem.

Shape Gusset:

Knit across the first 7 sts (this is needle #3 and will be the center of your heel) and. mark with marker or safety pin. With the next needle (needle #1) knit across the other 7 heel sts, then pick up 12 sts along the side of the heel flap (19 sts); with needle #2 knit across the 24 sts; with extra dpn pick up 12 sts along the heel flap and knit last 7 heel sts (19 sts) -- 62 sts.

Note: There should be 19 sts each on needles #1 and #3; and 24 sts on needle #2. Decs will now be worked at the end of first needle and beginning of 3rd needle.

Rnd 1: Knit to last 3 sts on needle #1, k2tog, k1; knit across instep on needle #2; on needle #3, k1, ssk, k to end of rnd.

Rnd 2: Work even in pattern as established.

Repeat last 2 rnds until there are 12 sts each on needles #1 and 3, and 24 sts on needle #2 – 48 sts. Work evenly in St st until sock (slightly stretched) measures 2" less than desired length of bottom of foot. (Medium size is 7 ½” long; Large size is 8 ½” long.)

Shape Toe:

Rnd 1: Knit to last 3 sts on needle #1, k2tog, k1; on needle #2, k1, ssk, k to last 3 sts, k2tog, k1; on needle #3, k1, ssk, knit to end.

Rnd 2: Knit.

Repeat these 2 rnds until 6 sts rem each on needles #1 and 3, and 12 sts rem on needle #2 – 24 sts.

Repeat only Rnd 1 until 8 sts rem.

Break yarn, leaving a 5" tail. Using yarn needle, thread the yarn through the rem sts and pull tight to fasten.

To make the toe finish firmer, run the yarn through the sts again.

FINISHING

Weave in ends and block.
 

Loving this pattern, I love knitting socks anyway, but this is so pretty and it would be pretty good pattern for a knitting beginner. Hope you have a look and enjoy them too.

Sunday, November 7, 2010

Hat, Scarf, and Mitt set for Knitting

<html xmlns="http://www.w3.org/1999/xhtml"><body xmlns="http://www.w3.org/1999/xhtml"><div xmlns="http://www.w3.org/1999/xhtml">

This Hat, Scarf, and Mitt set is knit from Bernat® Roving, a warm and luxurious yarn that's perfect for Winter. Wide textured ribs make this set extra warm and squeezable. This pattern has some cook stitches in it too. But still good for a knitting beginner I plan to make this, this winter.

Wednesday, November 3, 2010

Free Crochet Pattern Crochet 5 1/2 Hour Throw

This is one of those great patterns that is perfect for the crochet beginner. And it is interesting because you hold three strands of yarn at once to crochet with which makes this pattern go like lightening. A great weekend project.

Saturday, October 16, 2010

Ruffled Baby Blanket

Make an easy crochet blanket for your little baby this Easter. The colors are nice and pastel perfect for the occasion. An H hook is used with Red Heart yarn.

Materials:

  • RED HEART® “Moon & Stars™”: 5 balls each 3001
  • Snow A and 3720 Pink Chiffon C, 2 balls 3624 Limeade B.
  • Crochet Hook: 5mm [US H-8].
  • Yarn needle.

GAUGE: 15 dc = 4”; 7 rows = 4”. CHECK YOUR
GAUGE. Use any size hook to obtain the gauge.
SPECIAL ABBREVIATIONS:
Beg Cluster = Ch 3, 2 dc, holding back last loop on hook,
yo and through all loops on hook.
Cluster = 3 dc in next st or space, holding back last loop
of each dc, yo and through all 4 loops.
BLANKET
With B, ch 4; join with a slip st to form a ring.
Rnd 1: Ch 3, 2 dc in ring, [ch 3, 3 dc in ring] 3 times, ch 1, hdc in beginning ch-3.
Rnd 2: Ch 3, dc over st just made, dc in next 3 sts, [(2 dc, ch 3, 2 dc all in corner ch-3 space), dc in next 3 sts] 3 times, 2 dc in corner, ch 1, hdc to beginning ch-3. Fasten off.
Rnd 3: Join A in any corner ch-3 space, (ch 3, dc, ch 3, 2 dc) all in same space, * dc in each st to next corner, ** (2 dc, ch 3, 2 dc) in corner; repeat from * around ending at **; join to beginning ch-3.
Rnd 4: Ch 3, dc in next st, * (2 dc, ch 3, 2 dc) all in next ch-3 space, dc in each st to corner; repeat from * around, ending with dc in last 9 sts; join to beginning ch-3. Fasten off.
Rnd 5: Join C and repeat Rnd 3.
Rnd 6: Repeat Rnd 4. Fasten off.
Rnd 7: Join A in any corner, ch 1, * (sc, ch 3, sc) all in same corner, sc in each st to next corner; repeat from * around; join to beginning sc.
Rnds 8-14: Repeat Rnd 7 in following color sequence:
B, A, C, B, C, A, B.
Rnd 15: Join C in any corner, repeat Rnd 3.
Rnd 16: Join B in any corner, repeat Rnd 7.
Rnd 17: Join C in any corner, repeat Rnd 3.
Rnd 18: Join B in any corner, repeat Rnd 7.
Rnd 19: Join A in any corner, repeat Rnd 3.
Rnd 20: Join B in any corner, repeat Rnd 7.
Rnd 21: Join A in any corner, repeat Rnd 3.
Rnd 22: Join C in any corner, (ch 3, dc, ch 3, 2 dc) all in same corner, * ch 1, skip next st, dc in next st; repeat from * around working (2 dc, ch 3, 2 dc) in each corner; join.
Rnds 23-27: Slip st to corner, (ch 3, dc, ch 3, 2 dc) all in same corner, ch 1, skip next st, dc in next st, * ch 1, skip ch-1 space, dc in next dc; repeat from * around working (2 dc, ch 3, 2 dc) in each corner; join.
Rnd 28: Join A in any corner, (beg cluster, ch 1, cluster, ch 3, cluster, ch 1, cluster) all in corner, * ch 1, cluster in next ch-1 space; repeat from * around working (cluster, ch 1, cluster, ch 3, cluster, ch 1, cluster) all in each corner; join.
Rnd 29: Join B in any corner, repeat Rnd 28.
Rnd 30: Join A in any corner, repeat Rnd 28.
Rnd 31: Join C in any corner, (ch 3, dc, ch 3, 2 dc) all in same space, * 2 dc between cluster; repeat from * around working (2 dc, ch 3, 2 dc) in corner; join.
Rnds 32-34: Slip st to corner, (ch 3, dc, ch 3, 2 dc) all in same corner, * 2 dc between next group of 2 dc; repeat from * around working (2 dc, ch 3, 2 dc) in each corner; join.
Rnd 35: Join A in any corner, (ch 3, dc, ch 3, 2 dc) all in same corner, 2 dc in each st around working (2 dc, ch 3, 2 dc) in each corner; join.
Rnds 36-37: Ch 3, dc in each st around working (2 dc, ch 3, 2 dc) in each corner; join. Fasten off.
Edging
Join C in last st before any corner, ch 1, (sc, ch 3, dc) all in same st, [sc, ch 3, dc] 2 times in corner, * skip next 2 sts, (sc, ch 3, dc) all in next st; repeat from * around working [sc, ch 3, dc] 2 times in each corner; join. Fasten off.
Weave in ends.

ABBREVIATIONS: approx = approximately; ch = chain; dc = double crochet; hdc = half double crochet; rnd(s) = round(s); sc = single crochet; st(s) = stitch(es);
yo = yarn over needle; [ ] = work directions in brackets the number of times specified; * or ** = repeat whatever follows the * or ** as indicated.

This is so cute and just perfect for that precious baby girl. It is easy to crochet and you could use a variety of yarns. It is also up to your imagination as to what colors you would use. But I do like their choices. It is just so cute, good for experienced or crochet beginners.

Wednesday, October 13, 2010

Afghan with Sleeves Crochet Pattern

This afghan with sleeves, cleverly called a "wrap-ghan" by Bernat, keeps you warm with your hands free to read, sip a cup of tea or work the remote. Make your own sleeved blanket in colors to match your decor with super-value yarn.

Crochet Afghan with Sleeves

Materials:

  • Yarn: Bernat® Super Value (Solids: 197 g/7 oz) (389 m/426 yds) Child- 6 balls Adult- 8 ballsOR Bernat® Worsted (Big Ball) (Solids: 400 g/14 oz) (532 m/582 yds) OR Bernat® Berella 4 (Solids: 100 g/3.5 oz) (197 m/216 yds)

    Child Size: 1910 yds/1750 m
    Adult Size: 2670 yds/2450 m
     

  • Crochet Hook: Size 5.5 mm (U.S. I or 9) crochet hook or size needed to obtain gauge.

Gauge: 12 sts and 10 rows = 4 ins [10 cm] in pat.

Sizes:
To fit chest/bust measurements
Child Size: 24-32 ins [ 61-81.5 cm ]
Adult Size: 34-56 ins [ 86.5-142 cm ]


Instructions:

The instructions are written for Child size. If changes are necessary for Adult size the instructions will be written thus ( ).

BODY
Ch 136 (174).
1st row: (RS). 1 sc in 2nd ch from hook. *1 dc in next ch. 1 sc in next ch. Rep from * across. 135 (173) sts. Turn.
2nd row: Ch 3 (counts as dc). *1 sc in next dc. 1 dc in next sc. Rep from * to end of row. Turn.
3rd row: Ch 1. 1 sc in first dc. *1 dc in next sc. 1 sc in next dc. Rep from * to end of row. Turn.
Rep last 2 rows for pat until work from beg measures 33½ (44½) ins [85 (113) cm], ending with a WS row.
Divide for armholes: Next row: (RS).
Pat across 35 (45) sts. Sl st across next 10 (11) sts. Pat across 45 (61) sts. Sl st across next 10 (11) sts. Pat across 35 (45) sts. Turn.

Right Back: Cont in pat on last 35 (45) sts until armhole measures 8½ (10½) ins [21.5 (26.5) cm], ending with a RS row.
Shape shoulder: Next row: (WS). Pat across 25 (31) sts. Turn. Leave rem sts unworked.
Collar: Cont in pat on 25 (31) sts until work from shoulder edge measures 3 (4½) ins [7.5 (11.5) cm], ending with a WS row. Fasten off.

Front: With WS facing, join yarn with sl st to center 45 (61) sts. Cont even in pat until armhole measures 8½ (10½) ins [21.5 (26.5) cm], ending with a RS row.
Shape shoulders: Next row: (WS). Sl st across first 10 (14) sts. Pat across next 25 (33) sts. Turn. Leave rem sts unworked.
Collar: Cont in pat until work from shoulder edge measures 3 (4½) ins [7.5 (11.5) cm], ending with a WS row. Fasten off.

Left Back: With WS facing, join yarn with sl st to rem 35 (45) sts. Cont even in pat until armhole measures 8½ (10½) ins [21.5 (26.5) cm], ending with a RS row.
Shape shoulder: Next row: (WS). Sl st across first 10 (14) sts. Pat to end of row. Turn.
Collar: Cont in pat on rem 25 (31) sts until work from shoulder edge measures 3 (4½) ins [7.5 (11.5) cm], ending with a WS row. Fasten off.

SLEEVES
Ch 32 (40).
1st row: (RS). 1 sc in 2nd ch from hook. *1 dc in next ch. 1 sc in next ch. Rep from * across. 31 (39) sts. Turn.
2nd row: Ch 3 (counts as dc). *1 sc in next dc. 1 dc in next sc. Rep from * to end of row. Turn.
3rd row: Ch 1. 1 sc in first dc. *1 dc in next sc. 1 sc in next dc. Rep from * to end of row. Turn.
4th row: As 2nd row.
5th row: Ch 1. 2 sc in first st. *1 dc in next sc. 1 sc in next dc. Rep from * to last 2 sts. 1 dc in next sc. 2 sc in last st. Turn. 6th row: Ch 1. 1 sc in first dc. *1 dc in next sc. 1 sc in next dc. Rep from * to end of row. Turn.
Rep last 2 rows 9 (11) times more. 51 (63) sts.
Cont even in pat until work from beg measures 12½ (17½) ins [32 (44.5) cm], ending with a WS row. Place markers at each end of last row.
Work 4 (6) rows even in pat. Fasten off.

FINISHING
Sew shoulder and collar seams. Sew in sleeves placing rows above markers along unworked sts of Body. Sew sleeve seams.

What an amazing idea. I just love this! Can't you see yourself snuggled up on the couch with this around you while reading or sipping tea. And it is the perfect crochet beginner

Monday, September 27, 2010

Mesh Diamond Baby Blanket Crochet Pattern

The open diamond work in this baby blanket

crochet pattern creates a light and lovely accent for the nursery. This baby blanket is sure to become an heirloom.

Mesh Diamond Blanket Crochet

MATERIALS

  • Bernat® Cottontots (Solids: 100 g / 3.5 oz)
    • 6 balls: #90007 (Sweet Cream)
  • or Bernat® Cottontots (Ombres: 85 g / 3 oz)
  • 7 balls
  • Crochet Hook: size 5 mm (U.S. H or 8) or size needed to obtain gauge.

MEASUREMENTS
Approx 39 x 40 ins [99 x 101.5 cm]

GAUGE
15 hdc and 11 rows = 4 ins [10 cm].

INSTRUCTIONS
Note: Ch 2 at beg of row counts as hdc.
Ch 143.
1st row: 1 hdc in 3rd ch from hook (as 1 hdc). *1 hdc in next 5 ch. Ch 2. Miss next 3 ch. 1 hdc in next 6 ch. Rep from * to end. Turn.
2nd row: Ch 2. *1 hdc in next 4 hdc. Ch 4. Miss next hdc, ch 2, hdc. 1 hdc in next 5 hdc. Rep from * to end. Turn.
3rd row: Ch 2. *1 hdc in next 3 hdc. Ch 2. 1 hdc in next ch-4 sp. Ch 2. Miss next hdc. 1 hdc in next 4 hdc. Rep from * to end. Turn.
4th row: Ch 2. *1 hdc in next 2 hdc. Ch 2. 3 hdc in next hdc. Ch 2. Miss next hdc. 1 hdc in next 3 hdc.
Rep from * to end. Turn.
5th row: Ch 2. *1 hdc in next hdc. Ch 2. 1 hdc in next ch-2 sp. 1 hdc in next 3 hdc. 1 hdc in next ch-2 sp. Ch 2. Miss next hdc. 1 hdc in next 2 hdc.
Rep from * to end. Turn.
6th row: Ch 4 (as hdc and ch 2). *1 hdc in next ch-2 sp. 1 hdc in each 5 hdc. 1 hdc in next ch-2 sp. Ch 2. Miss next hdc. 1 hdc in next hdc. Ch 2. Rep from *, ending with 1 hdc in last hdc. Turn.
7th row: Ch 3 (as hdc and ch 1). *1 hdc in next ch-2 sp. 1 hdc in next 7 hdc. 1 hdc in next ch-2 sp. Ch 4. Rep from *, ending with Ch 1. 1 hdc in 2nd ch of ch 4. Turn.
8th row: Ch 2. *1 hdc in next ch-1 sp. 1 hdc in next 9 hdc.** (1 hdc. Ch 2. 1 hdc) in next ch-4 sp. Rep from *, ending at **. 1 hdc in next ch-1 sp. 1 hdc in 2nd ch of ch 3. Turn.
9th row: Ch 3 (as hdc and ch 1). Miss next hdc. *1 hdc in next 9 hdc.** Ch 4. Miss next hdc, ch-2 sp, hdc. Rep from *, ending at **. Ch 1. Miss next hdc. 1 hdc in last hdc. Turn.
10th row: Ch 4 (as hdc and ch 2). Miss next ch-1 sp and hdc. *1 hdc in next 7 hdc. Ch 2.** 1 hdc in next ch-4 sp. Ch 2. Miss next hdc. Rep from *, ending at **. 1 hdc in 2nd ch of ch 3. Turn.
11th row: Ch 2. 1 hdc in first hdc. *Ch 2. Miss next hdc. 1 hdc in next 5 hdc. Ch 2.** 3 hdc in next hdc. Rep from *, ending at **. 2 hdc in 2nd ch of ch 4. Turn.
12th row: Ch 2. *1 hdc in next hdc. 1 hdc in next ch-2 sp. Ch 2. Miss next hdc. 1 hdc in next hdc. Ch 2. 1 hdc in next ch-2 sp. 1 hdc in next 2 hdc. Rep from * to end. Turn.
13th row: Ch 2. *1 hdc in next 2 hdc. 1 hdc in next ch-2 sp. Ch 2. Miss next hdc. 1 hdc in next hdc. Ch 2. 1 hdc in next ch-2 sp. 1 hdc in next 3 hdc. Rep from * to end. Turn.
14th row: Ch 2. *1 hdc in next 3 hdc. 1 hdc in next ch-2 sp. Ch 4. Miss next hdc. 1 hdc in next ch-2 sp. 1 hdc in next 4 hdc. Rep from * to end. Turn.
15th row: Ch 2. *1 hdc in next 4 hdc. (1 hdc. Ch 2. 1 hdc) in next ch-4 sp. 1 hdc in next 5 hdc. Rep from * to end. Turn.
Rep 2nd to 15th rows for pat until approx 40 ins [101.5 cm] total length, ending with 15th row.
Fasten off.


A very cute crochet baby blanket. And a great pattern for a crochet beginner